Travel - Bakkie
The Canopy
A day to day part of living in South Africa is pilfering and petty theft, which means you cannot leave unattended goods in an open load-box on a bakkie - you have to lock it up. This means some form of lock-up container is a necessity. I am in favour of canopies as these give you plenty of packing options without having to tow a trailer.
As it had been more than twenty years since my last canopy purchase, I had to do my research from scratch. I started with the South African 4x4 Community Forum, as these folks are serious off-roaders/overlanders and would give good advice as to what currently works best. One thing I was very interested in was that the canopy had lockable flaps on the sides, to make access to the load-box easier when the vehicle was packed.
I eventually decided on a canopy from 4x4 Community Forum member SarelF, whose company Blinkgat Products, made custom-built aluminium canopies, canopy campers, and trailers. What was also nice was the discount he was offering for October, which made his canopies half the price of similar canopies from suppliers in Pretoria.

The canopy in the making (Photo courtesy Sarel de Klerk)

Putting final touches to the canopy on collection day

Sarel inspecting the canopy after it had been placed on the load-box
A problem with fitting a canopy to a Ford bakkie, was that its weight was known to cause cracks the load-box in some cases. Ford refuse to honour any warranty for this unless Ford approved brackets were used. Sarel said that although none of his canopies that had gone out on Ford/Mazda bakkies had had any problems, he would make brackets to fit like the Ford brackets. This turned out to be a problem, as the brackets he received from Ford were only for the front end, so he had to come up with his own idea for the rear end. As the front end brackets used the screws from the load-box tie down points, he made brackets for the rear which also used the load-box tie down points.

Custom made front bracket using the tie down point screws to secure it

Custom made rear bracket, also using the tie down point screws
After fighting with the levelling of the canopy, and Eskom's regular power outages on the day, the canopy was finally done. Fortunately, the inverter in Sarel's Amarok saved the day by at least allowing his guys to use their drills!

Ready to roll
What appeared to be an issue with the canopy was that from the outside, it did not seem to fit squarely on the walls of the load-box.

The canopy appears not to be square on the load-box
However, looking at the canopy from the inside, it is seated squarely on the walls of the load-box.

Here one can clearly see that the canopy is seated squarely
The issue here is that width of the top of walls of the load-box increases from back to front.

In my driveway after fitting the canopy
Dust
A major problem we found during the tour of Namibia, was that a huge amount of dust got into the load-box. This was so bad that we had to put our luggage into refuse bags. With the new bakkie, I found that even without the canopy, a fair amount of dust was deposited in the load-box. The reason for this can be seen by the fairly large gap around the edges of the tailgate.

Very large gaps around the edges of the tailgate. Along the sides the gap is large enough to insert a finger.
The workshop manager at CMH Ford recommended that I put a strip of rubber across the floor of the load-box at the interface with the tailgate (he very kindly gave me a strip for this purpose).
I shaped the rubber to fit the complete width of the tailgate. The workshop manager suggested screwing or riveting the rubber in place, but the gap between the tailgate and the floor, when the tailgate is open, makes fixing it in place rather difficult.

The opening between the tailgate and the floor of the load-box
Note the rubber strip along the base of the tailgate — this serves no purpose as the dust gets past it.
Fortunately, the thickness of the rubber was only marginally more than the gap between the closed tailgate and the floor of the load-box, so what I decided to do was to place the rubber in place, and secure it by closing the tailgate on the rubber. Having the rubber loose also makes it much easier to clean it.

The rubber in place on the load-box floor (Note the residue of the dust that it had stopped)

The rubber secured with the tailgate closed
What also helps with the dust is to have the front window of the canopy open when driving on dirt roads. However, this works best with a better sealing tailgate.
Dust - Update
Searching the web for solutions for the dust issue led me to this oldish thread on the SA 4x4 Community forum. The method put forward by Trader77 (posts #4 and #7) of using foam tape appealed to me as it was cheap (very cheap) and required no drilling into the load-box. I found the tape at a nearby Chamberlain's Hardware Store.

Foam tape to seal tailgate
Fitting the tape to the countour of the body was was easy due to the flexibilty of the tape. Small notches were cut into the tape to allow the tailgate stop-cord and stopper to pass through easily.

The tailgate closed, showing a nicely closed gap
Dust - Update 2
In spite of all my efforts, dust continued to be a problem on gravel roads. The canopies on my previous bakkies had a vent fitted to the top of the canopy, which, when open while driving, created a positive pressure inside the canopy/load-box. This positive pressure minimised dust ingress. As a vent on the top of this canopy was not feasible, I queried Sarel and he said a vent on the left-hand side of the canopy would work well as this was on the opposite side of the driving line of on-coming traffic. His team fitted a vent with a minimum of fuss, without breaking the bank.
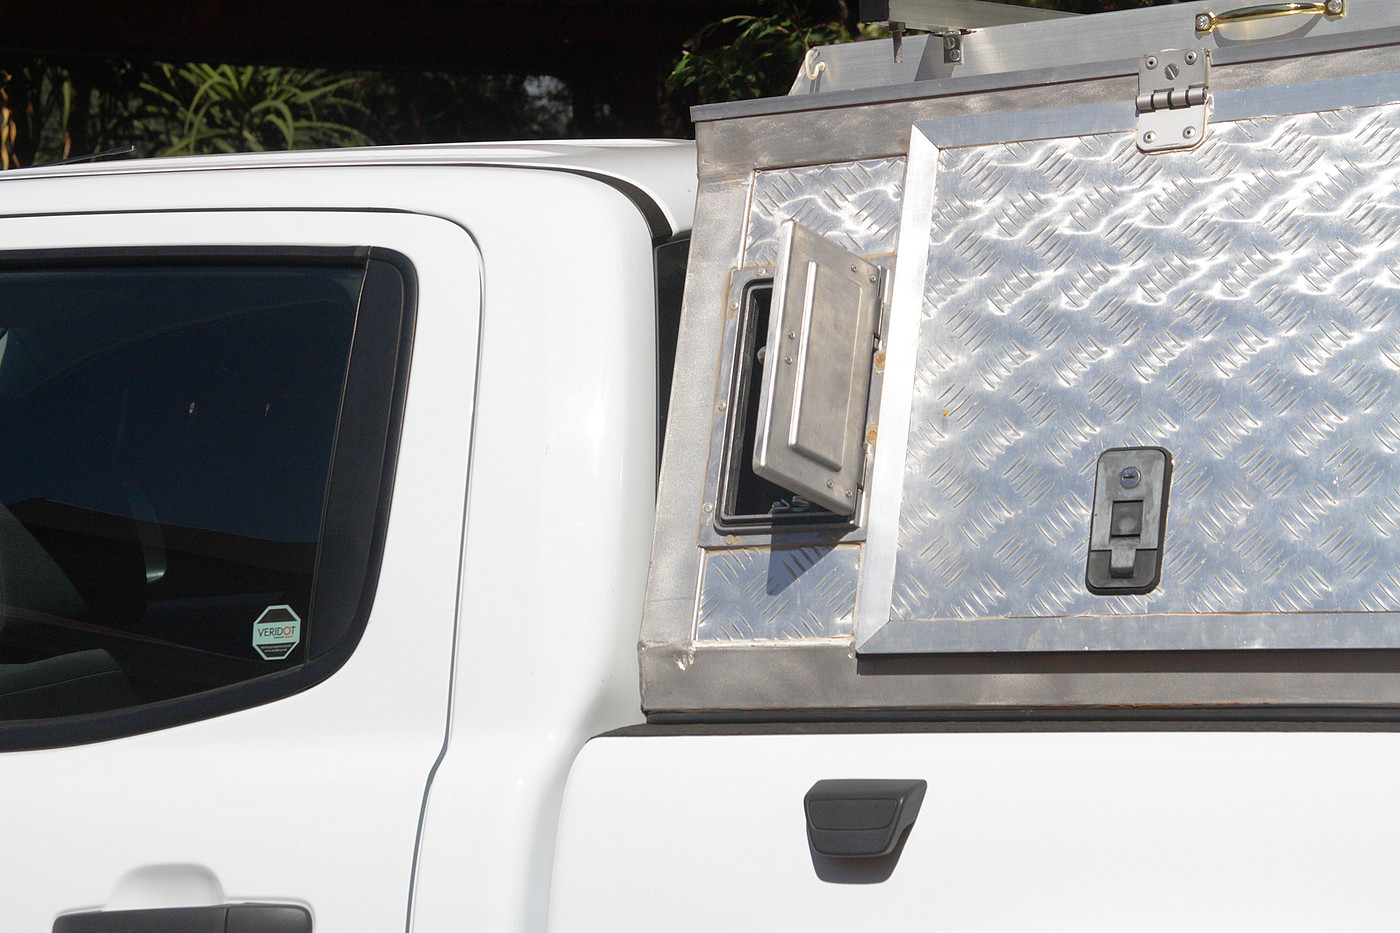
The open vent
This has worked like a charm. It also serves as a very useful port for electrical cables into (or out of) the load-box when camping.
28 April 2016 (updated: 30 October 2026)
Back to the bakkie's story.
